Tuesday, October 20, 2009

AGU recently announced a special late-breaking session for the fall meeting this year. Abstract deadline is Oct. 30th. This session is sure to be full of some exciting talks!


The 2009 Samoan and Sumatran Earthquakes: Origins, Impacts and Consequences
Category: Seismology

Co-Sponsors: G, NG, NH, OS, DI, T

On 29 September 2009 the Pacific plate ruptured in a normal faulting earthquake of magnitude 8.3 close to its subduction beneath the Australian plate. The resulting sea-floor displacement generated a tsunami that resulted in loss of life and great destruction in Samoa and American Samoa. Less than 20 hours later and some 10000 great circle kilometres distant a magnitude 7.6 event shook the city of Padang in Sumatra. At the time of writing over 1100 are confirmed dead, many more are still missing and great areas of the city are devastated. One day later another earthquake M6.6 ruptured the great Sumatran fault more than 250 km to the southeast.
Many important questions arise from these events: What was their mechanism and tectonic context?
What were the features of the Samoan event which generated the tsunami and how could its effect have been mitigated? Why was the Padang earthquake so devastating and what was its relationship to the recent great megathrust earthquakes on the Sunda subduction zone? What are the implications of this event for the high seismic and tsunami risk from near-future megathrust earthquakes west of Sumatra? How can we best prepare vulnerable populations for them? Finally, is the temporal clustering of these large events purely coincidence or if not, what physical mechanisms might explain it? We encourage submissions on all aspects of these earthquakes.

Tuesday, October 6, 2009

From GeoMapApp to Google Earth: Visualize your data in a jiffy!

Seriously!

I am not sure if the old version of GeoMapApp supported such an easy import/export of data, but the new version, released October 1, sure does!

Here is how to bring in your data, view it, color and scale by value, and export it to Google Earth in a jiffy. A jiffy, of course, being relative to the amount of data you actually have.

1) Under the File menu, import your data into GeoMapApp. This can be a shapefile, a 2D grid, or a table/spreadsheet in ASCII or Excel. I selected an Excel file of oceanic transform fault data and it worked flawlessly.

2) Once loaded, your data should display on the map and the data table will appear below. On the right you will notice several options related to the data table, including Color by Value and Scale by Value. Selecting these brings up a drop down box of all your data parameters. Select one and a color bar will pop up that you can edit. Once done, be careful not to close out the colorbar box or you will lose your settings (perhaps a bug? I simply minimize it to get it out of the way).

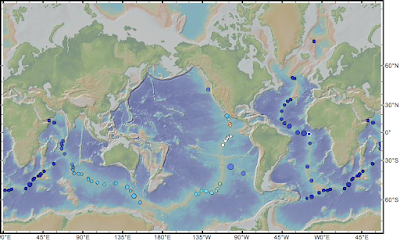
Here is what the transform fault data look like, colored by slip rate and sized by length:


3) To export to Google Earth simply click on the save drop-down box on the right and select Export to Google Earth (KMZ). You can either export selected data points or your entire table. Once you make your selection, a box pops that enables you to select which parameters to export. The next step lets you choose what parameter the placemark name will take, as well as rename parameters and set units. Once you click okay, GeoMapApp will export the kmz file.

Here is my exported kmz file inside Google Earth:


It does not color the placemarks by the value you selected in GeoMapApp, nor does it allow you to select your icon, but these things can be edited in the kmz file itself. What it does do is provide an easy way to get the data into Google Earth to begin with. Simply click on a placemark, and all your parameters for that point pop up!

So there you have it! Quick and easy data visualization in two great (and free!) geospatial data applications!

Glossaries package in Texnic Center on Windows

Okay, yesterday I posted about how to set up and use the glossaries package with TexShop on a Mac. Here is the Windows version using TexnicCenter. This is basically a condensed version of Nicole Talbot's (creator of the glossaries package) post on the same matter:

If your TexnicCenter frontend is using the MikTex tex distribution, you can use the MikTix package browser to install packages (very easy to do, and the recommended method.) Otherwise you can install them manually from CTAN.

Using your preferred method, install the following packages:


* ifthen
* xkeyval at least version 2.5f (2006/11/18)
* xfor
* amsgen (part of amstex)


Make sure you have the following in your preamble:


\usepackage[acronym]{glossaries}%makes a separate acronym list

\makeglossaries


If you want your terms in your text to be hyperlinked to their definition (way cool), add the following BEFORE \usepackage{glossaries}:


\usepackage[colorlinks]{hyperref}


Now, as mentioned in the yesterday's post, you can either define terms and acronyms in your preamble, or have them as separate tex files and use the \include{} command.

When you get to the location in your main document (after the \begin{document}) where you want your glossary to be, simply add the command:


\printglossaries


Now, here is where it can get a bit tricky. You need to build the glossary file first, and there really isn't an easy way to simply add an engine to TexnicCenter (at least not that I found). Glossaries uses a Perl script to build, so I found the easiest way to do this is to make sure I have Perl installed on my machine (recommend Active Perl, they have windows installers). There are other ways to build the file using makeindex or xindy commands (see Nicola's post, but you have to run them 3 times for every type of glossary file, and the Perl way is just easier and faster.


Once you are good to go with Perl installed, open a command prompt (start->run->cmd) and navigate to the directory with your Tex files.

Type the following at the command prompt (you do not need to include a filename extension):


makeglossaries filename


You should see a bunch of stuff fly by on the screen indicating your glossary file was created. Now simply go back to TexnicCenter and build the file as you normally would, and Viola!, you should have a document with a glossary file.

Monday, October 5, 2009

Creating Glossaries in TexShop on Mac

I was searching for a way to create a word list or dictionary in Latex, and came across the Glossaries package. This package is already installed if you use TexShop for Mac, but I still had problems getting it to work.

The problem is that you first have to be able to build the glossary file before you build your main latex document (similar to when you create a bibliography using Bibtex).

I found a very helpful blog post about all this here: http://www.ict-cloud.ch/2009/07/glossaries-acronyms-and-texshop.html.

I followed his steps and created a text file called "glossary_run.engine" that contained the following code:


#!/bin/sh

bfname=$(dirname "$1")/"`basename "$1" .tex`"

makeindex -s "$bfname".ist -t "$bfname".alg -o "$bfname".acr "$bfname".acn
makeindex -s "$bfname".ist -t "$bfname".glg -o "$bfname".gls "$bfname".glo


Save this file (you must use the .engine extension) to Users/.../Library/TexShop/Engines directory.

(Note: I first tried this with TextEdit. Even if you remove the .rtf extension, this will not work. It will work if you copy and paste the code into Emacs and then save it)

Next, make the file executable. In terminal, navigate to the above directory and type

$ chmod a+x glossary_run.engine

There you have it. The next time you open TexShop, the glossary_run engine (or whatever you named it) will be in the dropdown list next to typeset. Before you build your latex document, select this engine from the drop down and click typeset to build your glossary file first.


To use the glossaries package you will need the following in your preamble:


\usepackage[acronym]{glossaries} %makes a separate acronym list
%there are lots of different options for this package. acronym enables me to define acronyms as well as words

\makeglossaries

%Glossary-File - can include a separate glossary file here
\include{glossary file name.tex}

%Acronyms - can include a separate acronym file
\include{acronym file name.tex}

\begin{document}


Here is the test code I played around with. Instead of including separate files, I defined some terms and acronyms in the preamble. If I do it this way, I do not need the include terms, and instead just use the makeglossaries command:


\documentclass{article}
\usepackage[colorlinks]{hyperref}
\usepackage[acronym]{glossaries} % make a separate list of acronyms

\makeglossaries

%new glossary term
\newglossaryentry{sample}{name={sample}, description={a sample entry}}

%new acronym
\newacronym[\glsshortpluralkey=cas,\glslongpluralkey=contrived acronyms]{aca}{aca}{a contrived acronym}

\begin{document}
A \gls{sample} entry and %\gls{aca}.

Second use: \gls{aca}.

Plurals: \glspl{sample}.

%Reset acronym to first count

\glsreset{aca}

%note this now uses the plural form
First use: \glspl{aca}. Second use: \glspl{aca}.

\printglossaries

\end{document}


Yum! A nice, hot cup of putresince!

I suggest reading this with a nice hot mug of coffee by your side, as I did:

What's inside a cup of coffee?